
Picture by Writer
# Introduction
BitNet b1.58, developed by Microsoft researchers, is a local low-bit language mannequin. It’s educated from scratch utilizing ternary weights with values of (-1), (0), and (+1). As a substitute of shrinking a big pretrained mannequin, BitNet is designed from the start to run effectively at very low precision. This reduces reminiscence utilization and compute necessities whereas nonetheless holding robust efficiency.
There may be one vital element. If you happen to load BitNet utilizing the usual Transformers library, you’ll not routinely get the velocity and effectivity advantages. To totally profit from its design, that you must use the devoted C++ implementation known as bitnet.cpp, which is optimized particularly for these fashions.
On this tutorial, you’ll learn to run BitNet regionally. We’ll begin by putting in the required Linux packages. Then we’ll clone and construct bitnet.cpp from supply. After that, we’ll obtain the 2B parameter BitNet mannequin, run BitNet as an interactive chat, begin the inference server, and join it to the OpenAI Python SDK.
# Step 1: Putting in The Required Instruments On Linux
Earlier than constructing BitNet from supply, we have to set up the fundamental growth instruments required to compile C++ tasks.
- Clang is the C++ compiler we’ll use.
- CMake is the construct system that configures and compiles the challenge.
- Git permits us to clone the BitNet repository from GitHub.
First, set up LLVM (which incorporates Clang):
bash -c "$(wget -O - https://apt.llvm.org/llvm.sh)"
Then replace your bundle checklist and set up the required instruments:
sudo apt replace
sudo apt set up clang cmake git
As soon as this step is full, your system is able to construct bitnet.cpp from supply.
# Step 2: Cloning And Constructing BitNet From Supply
Now that the required instruments are put in, we’ll clone the BitNet repository and construct it regionally.
First, clone the official repository and transfer into the challenge folder:
git clone — recursive https://github.com/microsoft/BitNet.git
cd BitNet
Subsequent, create a Python digital atmosphere. This retains dependencies remoted out of your system Python:
python -m venv venv
supply venv/bin/activate
Set up the required Python dependencies:
pip set up -r necessities.txt
Now we compile the challenge and put together the 2B parameter mannequin. The next command builds the C++ backend utilizing CMake and units up the BitNet-b1.58-2B-4T mannequin:
python setup_env.py -md fashions/BitNet-b1.58-2B-4T -q i2_s
If you happen to encounter a compilation situation associated to int8_t * y_col, apply this fast repair. It replaces the pointer sort with a const pointer the place required:
sed -i 's/^([[:space:]]*)int8_t * y_col/1const int8_t * y_col/' src/ggml-bitnet-mad.cpp
After this step completes efficiently, BitNet shall be constructed and able to run regionally.
# Step 3: Downloading A Light-weight BitNet Mannequin
Now we’ll obtain the light-weight 2B parameter BitNet mannequin in GGUF format. This format is optimized for native inference with bitnet.cpp.
The BitNet repository gives a supported-model shortcut utilizing the Hugging Face CLI.
Run the next command:
hf obtain microsoft/BitNet-b1.58-2B-4T-gguf — local-dir fashions/BitNet-b1.58-2B-4T
This can obtain the required mannequin information into the fashions/BitNet-b1.58-2B-4T listing.
Throughout the obtain, you may even see output like this:
data_summary_card.md: 3.86kB [00:00, 8.06MB/s]
Obtain full. Shifting file to fashions/BitNet-b1.58-2B-4T/data_summary_card.md
ggml-model-i2_s.gguf: 100%|████████████████████████████████████████████████| 1.19G/1.19G [00:11<00:00, 106MB/s]
Obtain full. Shifting file to fashions/BitNet-b1.58-2B-4T/ggml-model-i2_s.gguf
Fetching 4 information: 100%|████████████████████████████████████████████████| 4/4 [00:11<00:00, 2.89s/it]
After the obtain completes, your mannequin listing ought to appear like this:
BitNet/fashions/BitNet-b1.58-2B-4T
You now have the 2B BitNet mannequin prepared for native inference.
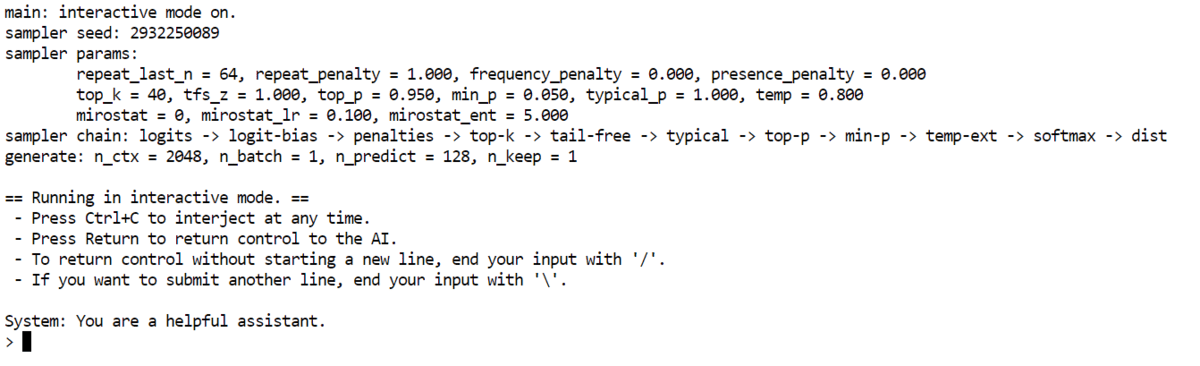
# Step 4: Working BitNet In Interactive Chat Mode On Your CPU
Now it’s time to run BitNet regionally in interactive chat mode utilizing your CPU.
Use the next command:
python run_inference.py
 -m "fashions/BitNet-b1.58-2B-4T/ggml-model-i2_s.gguf"
 -p "You're a useful assistant."
 -cnv
What this does:
- -m masses the GGUF mannequin file
- -p units the system immediate
- -cnv permits dialog mode
You too can management efficiency utilizing these optionally available flags:
- -t 8 units the variety of CPU threads
- -n 128 units the utmost variety of new tokens generated
Instance with optionally available flags:
python run_inference.py
 -m "fashions/BitNet-b1.58-2B-4T/ggml-model-i2_s.gguf"
 -p "You're a useful assistant."
 -cnv -t 8 -n 128
As soon as operating, you will notice a easy CLI chat interface. You possibly can sort a query and the mannequin will reply straight in your terminal.
For instance, we requested who’s the richest particular person on the earth. The mannequin responded with a transparent and readable reply based mostly on its information cutoff. Despite the fact that it is a small 2B parameter mannequin operating on CPU, the output is coherent and helpful.

At this level, you may have a totally working native AI chat operating in your machine.
# Step 5: Beginning A Native BitNet Inference Server
Now we’ll begin BitNet as an area inference server. This lets you entry the mannequin by way of a browser or join it to different purposes.
Run the next command:
python run_inference_server.py
  -m fashions/BitNet-b1.58-2B-4T/ggml-model-i2_s.gguf
 — host 0.0.0.0
 — port 8080
 -t 8
 -c 2048
 — temperature 0.7
What these flags imply:
- -m masses the mannequin file
- -host 0.0.0.0 makes the server accessible regionally
- -port 8080 runs the server on port 8080
- -t 8 units the variety of CPU threads
- -c 2048 units the context size
- -temperature 0.7 controls response creativity
As soon as the server begins, will probably be obtainable on port 8080.

Open your browser and go to http://127.0.0.1:8080. You will note a easy internet UI the place you may chat with BitNet.
The chat interface is responsive and easy, regardless that the mannequin is operating regionally on CPU. At this stage, you may have a totally working native AI server operating in your machine.

# Step 6: Connecting To Your BitNet Server Utilizing OpenAI Python SDK
Now that your BitNet server is operating regionally, you may hook up with it utilizing the OpenAI Python SDK. This lets you use your native mannequin similar to a cloud API.
First, set up the OpenAI bundle:
Subsequent, create a easy Python script:
from openai import OpenAI

shopper = OpenAI(
   base_url="http://127.0.0.1:8080/v1",
   api_key="not-needed"  # many native servers ignore this
)

resp = shopper.chat.completions.create(
   mannequin="bitnet1b",
   messages=[
       {"role": "system", "content": "You are a helpful assistant."},
       {"role": "user", "content": "Explain Neural Networks in simple terms."}
   ],
   temperature=0.7,
   max_tokens=200,
)

print(resp.selections[0].message.content material)
Here’s what is occurring:
- base_url factors to your native BitNet server
- api_key is required by the SDK however normally ignored by native servers
- mannequin ought to match the mannequin title uncovered by your server
- messages defines the system and person prompts
Output:
Neural networks are a kind of machine studying mannequin impressed by the human mind. They’re used to acknowledge patterns in information. Consider them as a bunch of neurons (like tiny mind cells) that work collectively to unravel an issue or make a prediction.
Think about you are attempting to acknowledge whether or not an image reveals a cat or a canine. A neural community would take the image as enter and course of it. Every neuron within the community would analyze a small a part of the image, like a whisker or a tail. They might then move this data to different neurons, which might analyze the entire image.
By sharing and mixing the knowledge, the community can decide about whether or not the image reveals a cat or a canine.
In abstract, neural networks are a means for computer systems to study from information by mimicking how our brains work. They will acknowledge patterns and make choices based mostly on that recognition.
# Concluding Remarks
What I like most about BitNet is the philosophy behind it. It isn’t simply one other quantized mannequin. It’s constructed from the bottom as much as be environment friendly. That design selection actually reveals whenever you see how light-weight and responsive it’s, even on modest {hardware}.
We began with a clear Linux setup and put in the required growth instruments. From there, we cloned and constructed bitnet.cpp from supply and ready the 2B GGUF mannequin. As soon as all the pieces was compiled, we ran BitNet in interactive chat mode straight on CPU. Then we moved one step additional by launching an area inference server and at last linked it to the OpenAI Python SDK.
Abid Ali Awan (@1abidaliawan) is an authorized information scientist skilled who loves constructing machine studying fashions. At the moment, he’s specializing in content material creation and writing technical blogs on machine studying and information science applied sciences. Abid holds a Grasp’s diploma in expertise administration and a bachelor’s diploma in telecommunication engineering. His imaginative and prescient is to construct an AI product utilizing a graph neural community for college kids battling psychological sickness.