
Picture by Writer
# Introduction
I used to be searching for an alternative choice to OpenClaw, not as a result of it’s not helpful, however as a result of it will possibly really feel too heavy and bloated for easy on a regular basis use. I wished one thing light-weight, straightforward to arrange, and easy to hook up with WhatsApp with out going by too many sophisticated steps. That’s once I got here throughout Nanobot on GitHub, and I additionally seen that many individuals have been beginning to discuss it on YouTube.
On this tutorial, we are going to discover the Nanobot structure and the way it works. Then, in six easy steps, we are going to undergo the set up, setup, and strategy of connecting it to WhatsApp so you can begin utilizing it as a 24/7 synthetic intelligence (AI) agent for a variety of duties.
# Utilizing Nanobot For Your First AI Agent
Nanobot is a superb alternative for a primary AI agent as a result of it retains the general setup easy whereas nonetheless supporting the options that matter in real-world utilization. It might connect with messaging platforms similar to WhatsApp, Telegram, Slack, Discord, Feishu, QQ, and electronic mail, whereas additionally working with a variety of mannequin suppliers and mannequin context protocol (MCP) device servers. This supplies learners with a transparent approach to perceive how an agent is structured with out beginning with a system that feels overly complicated.
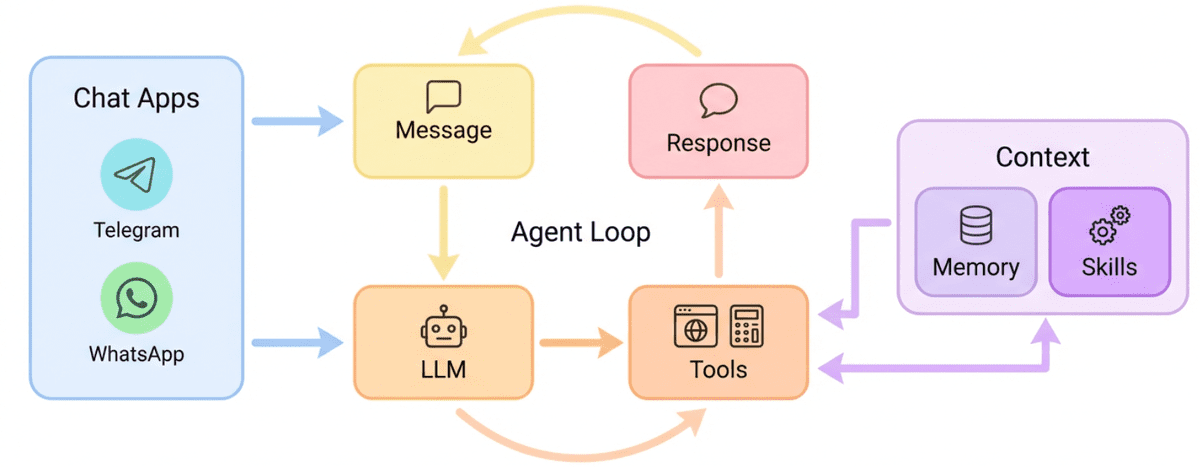
Structure of Nanobot | Picture from HKUDS/nanobot
It additionally stands out as an alternative choice to OpenClaw as a result of it provides sensible integrations and on a regular basis usability from the beginning. Alongside messaging channels, it helps device calling, net search, scheduled duties, voice transcription, real-time progress streaming, and a number of supplier choices, which makes it simpler to show it right into a helpful private assistant as an alternative of only a demo venture.
# Step 1: Putting in uv
First, set up uv, which Nanobot makes use of to handle the Python atmosphere and dependencies. Then, affirm it was put in accurately by checking the model.
curl -LsSf https://astral.sh/uv/set up.sh | sh
Test the set up:
Output:
uv 0.10.9 (f675560f3 2026-03-06)
# Step 2: Putting in Nanobot
As soon as uv is put in, use it to put in the Nanobot bundle. It will add the Nanobot command line interface (CLI) so it may be launched straight from the terminal.
uv device set up nanobot-ai

# Step 3: Initializing Your Nanobot Venture
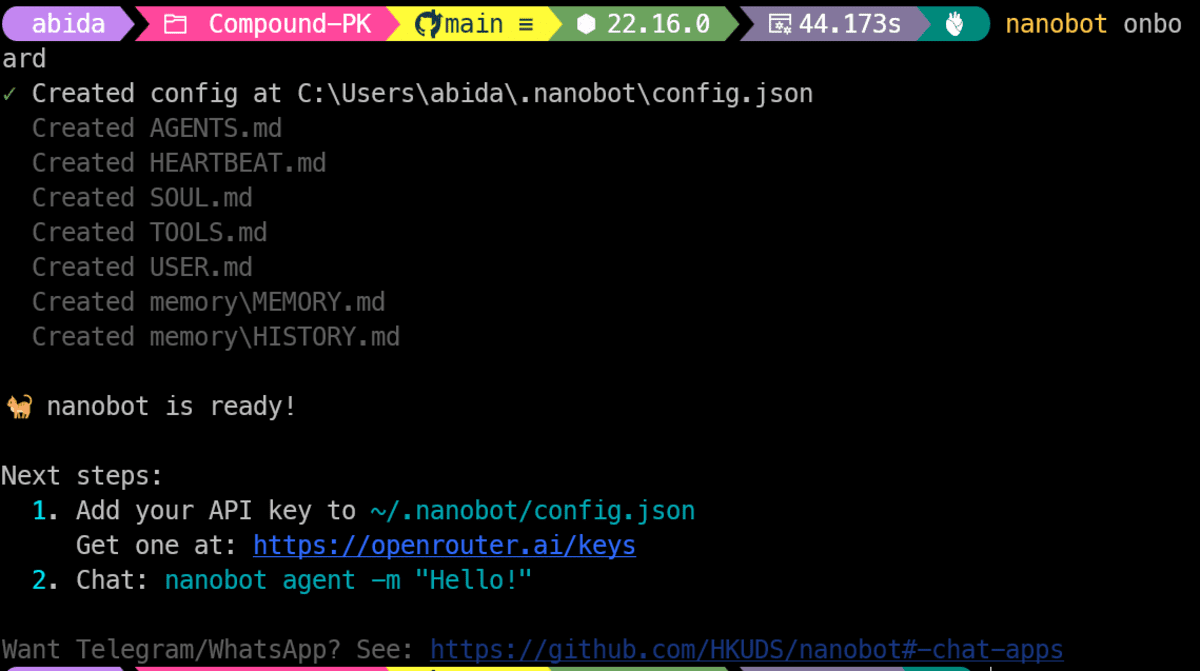
Subsequent, run the onboarding command to initialize Nanobot.
This creates the fundamental native setup, together with the default configuration listing at ~/.nanobot and the workspace Nanobot makes use of to retailer its information. After this step, Nanobot is prepared for supplier, mannequin, and channel configuration.
# Step 4: Including Your Nanobot Configuration
Navigate to your ~/.nanobot/config.json file, then copy and paste the configuration under. Earlier than saving, exchange the placeholder values with your individual OpenAI API key, mannequin, and WhatsApp quantity.
{
 "suppliers": {
   "openai": {
     "apiKey": "sk-REPLACE_ME"
   }
 },
 "brokers": {
   "defaults": {
     "mannequin": "openai/gpt-5.3-codex",
     "supplier": "openai"
   }
 },
 "channels": {
   "whatsapp": {
     "enabled": true,
     "allowFrom": ["1234567890"]
   }
 }
}
Earlier than you save, edit:
apiKeytogether with your actual OpenAI API keymannequinif you wish to use a unique mannequinallowFromwith your individual WhatsApp quantity
One essential word — current Nanobot points present that WhatsApp allowFrom formatting might be barely inconsistent in follow, and a few customers report it really works higher with out the “+” signal relying on their particular setup.
# Step 5: Connecting Nanobot To WhatsApp
Earlier than beginning the WhatsApp login stream, be certain that Node.js and npm are put in in your machine, for the reason that WhatsApp bridge runs by a Node-based course of.
First, begin the login stream in a single terminal:
nanobot channels login whatsapp
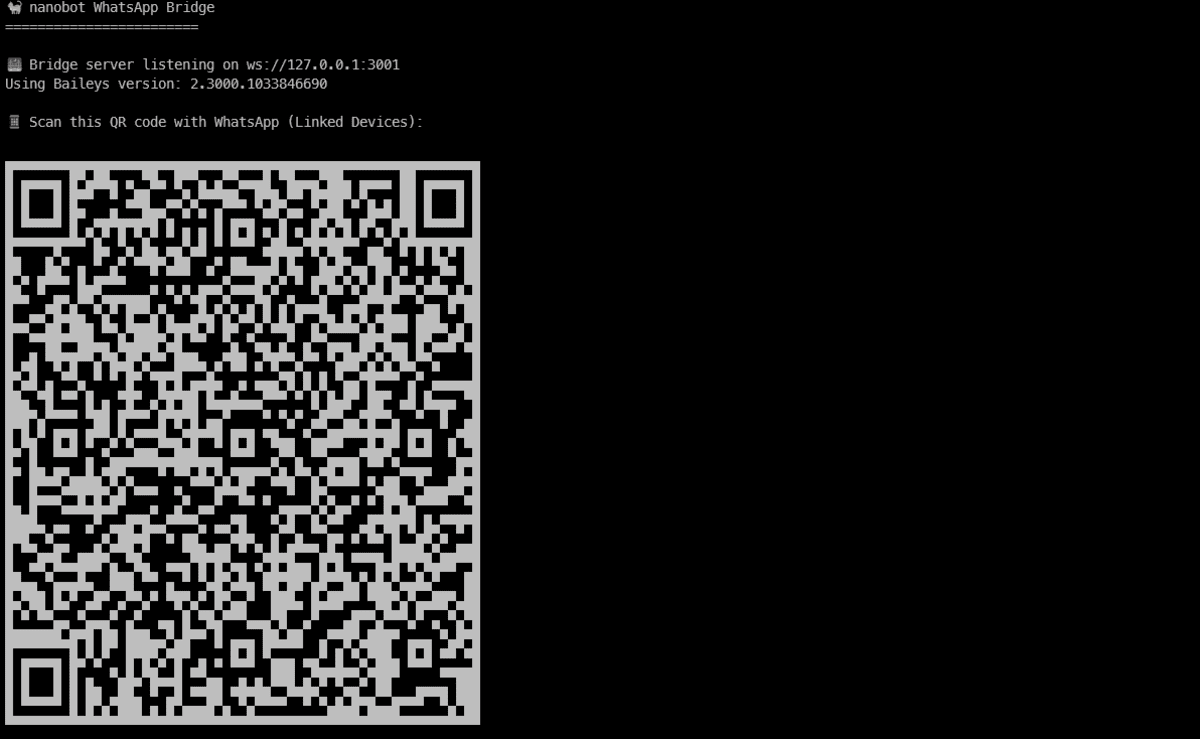
It will generate a QR code that it is advisable to scan from WhatsApp → Settings → Linked Units in your telephone. As soon as the system is linked, open a second terminal and begin the Nanobot gateway:
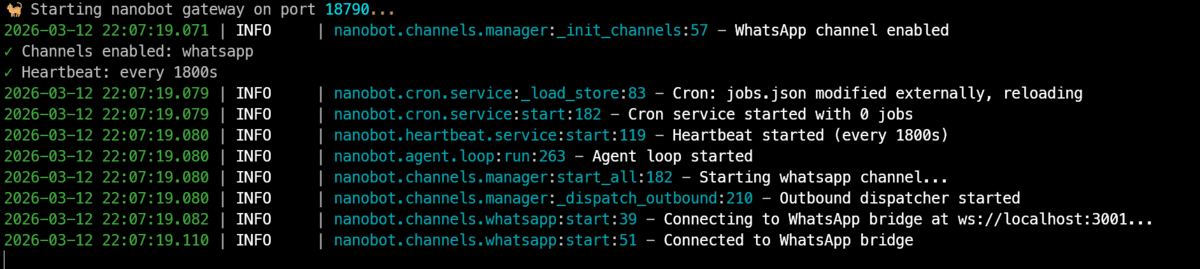
That is the method that retains the channel operating so Nanobot can obtain and reply to WhatsApp messages.
# Step 6: Testing Your AI Agent On WhatsApp
To check the agent, you’ll need a second telephone. This second telephone quantity ought to already be added to the allowFrom record in your configuration file. If you ship a message to the primary telephone quantity linked to Nanobot, it ought to reply by WhatsApp.
On this instance, the immediate asks what is going on on the planet. Nanobot then processes the request, performs an internet search if instruments are enabled, and returns an in depth snapshot based mostly on the newest data.
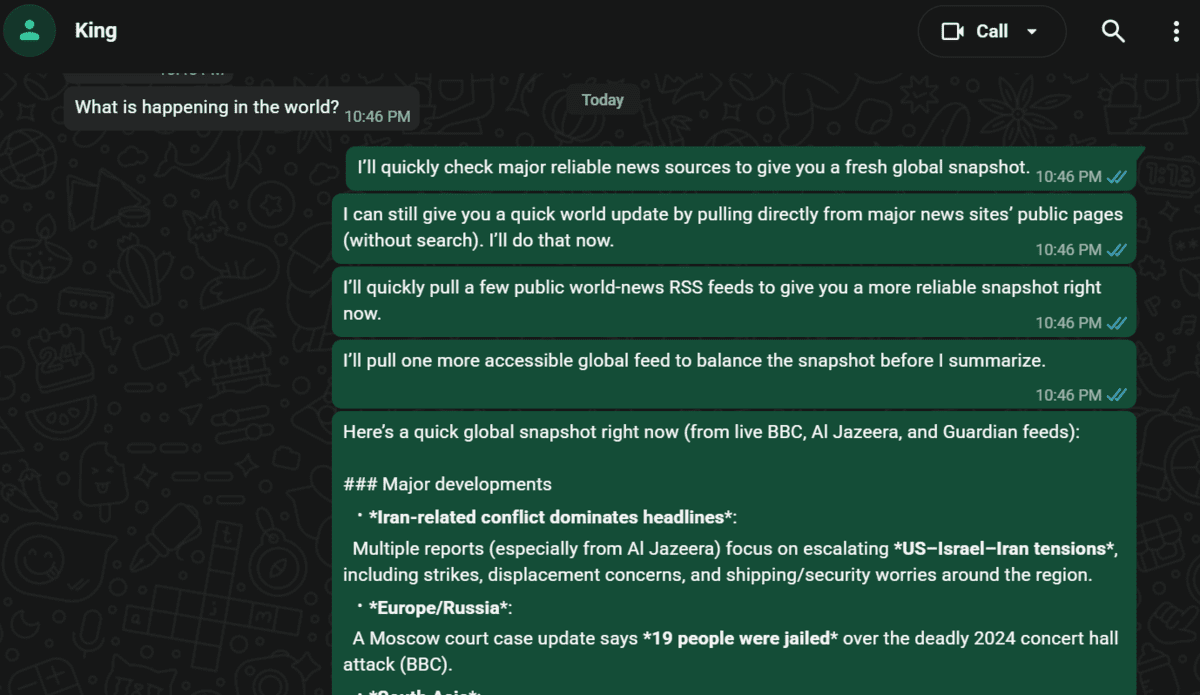
Whereas the gateway terminal is operating, you may observe the total agent workflow in actual time. This contains receiving the message, calling instruments, producing the response, and sending the reply again, which makes it simpler to substantiate that all the pieces is functioning accurately.

# Remaining Ideas
Establishing Nanobot confirmed me that constructing a private AI agent doesn’t need to be overly sophisticated, although it was not fully friction-free. I appreciated how shortly I may transition from a terminal setup to a working WhatsApp-connected agent that gives helpful responses in follow.
Nevertheless, I did encounter a couple of minor hurdles. On Home windows, if Node.js or npm was already put in in a sure configuration, the Python script generally didn’t detect npm accurately within the terminal, which made the preliminary setup barely complicated. Moreover, the dearth of intensive WhatsApp documentation meant it was not instantly apparent that the interface works by messaging the linked system straight somewhat than by a separate bot chat interface.
Regardless of these minor points, Nanobot stays a robust place to begin for anybody seeking to construct their first AI agent. It supplies a core agent expertise with out the overhead of heavier options. As soon as the setup is operational, its worth turns into instantly obvious, bridging the hole between easy terminal instructions and a very useful private assistant.
Abid Ali Awan (@1abidaliawan) is a licensed information scientist skilled who loves constructing machine studying fashions. At present, he’s specializing in content material creation and writing technical blogs on machine studying and information science applied sciences. Abid holds a Grasp’s diploma in know-how administration and a bachelor’s diploma in telecommunication engineering. His imaginative and prescient is to construct an AI product utilizing a graph neural community for college students scuffling with psychological sickness.