
Constructing a robotic arm isn’t just an engineering problem… it’s a multidisciplinary undertaking combining mechanical design, electronics, and robotic programming. On this information, you’ll study the steps to create your individual robotic arm to satisfy your objectives.
Whether or not you might be exploring the best way to construct a robotic arm for analysis functions, a startup prototype, or simply for a interest, we’ll stroll you thru your complete course of.
By the top of information, you’ll perceive the core ideas mandatory to construct your robotic arm, together with the place you’ll be able to go for additional data on every of the steps.
Why Construct a Robotic Arm?
There are numerous causes you may search for the best way to construct a robotic arm. The three commonest causes are to study robots, to create a analysis platform, and to prototype a robotics undertaking.
Right here’s what it is best to concentrate on for every of these causes…
To Be taught About Robotics
If you’re simply getting began in robotics, constructing an arm is an effective way to study concerning the core ideas of robotics.
If that is you, right here’s what to concentrate on when constructing your robotic arm:
- Purpose for a undertaking that facilities on the particular abilities you’d wish to study (e.g. programming, kinematics, electronics).
- Use a platform like Raspberry Pi that permits for simple integration.
- Experiment with completely different designs and ideas to increase your data. For instance, there are some enjoyable designs for constructing a robotic arm out of cardboard
To Create a Analysis Platform
Whether or not your a part of a analysis group or conducting a private analysis undertaking, constructing a robotic platform is commonly a primary step for analysis. A robotic arm is usually a helpful, easy platform in your analysis.
If that is you, right here’s what to concentrate on when constructing your robotic arm:
- Resolve which parts of your robotic platform will likely be novel — and thus contribute to the analysis output — and which you’ll copy from present designs.
- Use a programming platform that means that you can add your individual customized libraries and performance, such because the the RoboDK API.
- Design a system that means that you can spend extra time on growing your analysis and fewer time “fixing your robotic.”
To Prototype Your Robotic Product
If you need to construct a robotic arm to create a brand new product, your prime precedence turns into scalability. It’s good to steadiness the — seemingly conflicting — objectives of fast prototyping and reliability.
If that is you, right here’s what to concentrate on when constructing your robotic arm:
- Take into consideration how one can mix dependable robotic parts somewhat than reinventing the wheel. Try our article Why Create Turnkey Robotic Options? 10 Nice Advantages
- Contemplate scalability from the beginning. At all times be fascinated by how you’ll scale manufacturing while you transfer past prototyping.
- Check and debug constantly. [robot simulator][RKSIM] is a invaluable instrument to cut back errors and pace up the programming course of.
Step 1: Plan and Resolve Your Robotic’s Function
Now you’re clear why you might be constructing a robotic arm, step one is to make clear the aim of this undertaking.
Outline Your Robotic’s Function
The aim of your robotic will have an effect on the remainder of the design course of.
Ask your self what particular exercise the arm will carry out and in what surroundings it should function. For instance, take into account whether or not it should elevate objects (which might have an effect on the payload) or working a course of instrument (e.g. welding or reducing instrument).
Select Design Software program That’s Simple to Combine
If you’re designing your robotic in a Laptop Aided Design Software program, select a software program workflow that means that you can simply combine with robotic programming.
For instance, RoboDK has plugins for a lot of the widespread CAD packages, permitting you to seamlessly export your 3D fashions to RoboDK for programming.

Resolve on Your Actuation Kind
An necessary early resolution is what sort of actuation your robotic may have.
Frequent choices are electrical, hydraulic, or pneumatic. The most well-liked nowadays might be electrical; nevertheless, you may need a cause to decide on another choice. That is the time to resolve.
Step 2: Design the Mechanical Construction… and Do the Math
If you’re designing the mechanical construction of your robotic from scratch, you’ll in all probability want to grasp the mathematical, geometrical ideas of kinematics.
Plan Your Robotic’s Kinematics
Kinematics is a core idea in robotics for each robotic programming and arm design.
- Ahead Kinematics (FK)— This entails calculating the place the top effector will likely be for particular joint angles.
- Inverse Kinematics (IK) — This determines the required joint positions to maneuver the top effector to a exact place and orientation. Guide IK calculations might be complicated, however RoboDK’s built-in solvers make your life simpler by dealing with the calculation for you.
You may study extra about each forms of kinematics in our article Inverse Kinematics in Robotics: What You Have to Know
Weight Distribution and Hyperlink Design
Design your robotic construction to satisfy your required efficiency properties, equivalent to pace, payload capability, and precision.
As you design your hyperlinks, take into consideration weight distribution. For instance, a standard rule is to position as a lot of the robotic’s weight into the primary shoulder joint in order that the later joints don’t have to work additional to assist the burden of the robotic itself.
Step 3: Simulate, Construct and Program Your Robotic
After your design course of it’s time to construct your robotic arm. That is an iterative course of, beginning with simulation in software program, then constructing the bodily robotic. Programming needs to be concerned all through, not simply after you’ve constructed the bodily robotic.
Listed below are 7 steps for iteratively constructing a brand new robotic arm design:
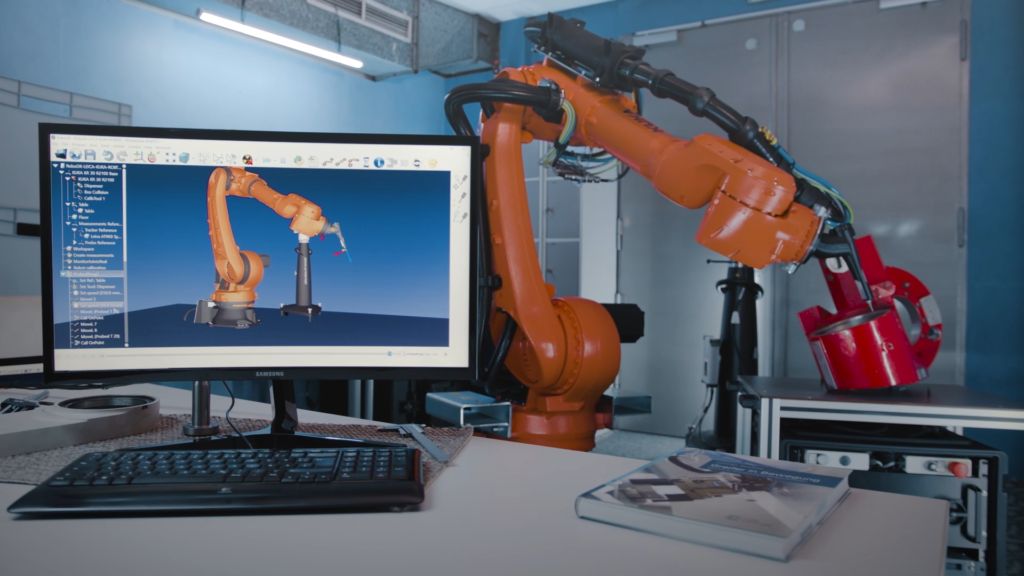
- Simulate the Robotic — Earlier than you even take into consideration constructing your bodily robotic, use the CAD designs you created in your earlier steps to create a simulation of your robotic arm. In RoboDK, you’ll be able to import your design as a brand new robotic and create a easy robotic program for testing.
- Enhance Your Design First — Throughout simulation, you’ll in all probability determine points of the bodily design that may be improved. Use the simulator to iteratively enhance the design earlier than you begin to construct the bodily robotic.
- Collect Bodily Parts — That is the stage the place you lastly collect your bodily management elements (e.g. microcontrollers, servos, sensors) and construct the bodily hyperlinks of the robotic.
- Check Your Actuators — Good apply is to check all of your actuators earlier than you construct the bodily robotic. This helps you determine if any actuator is damaged in addition to whether or not there are any uncommon behaviors coming out of your robotic program.
- Construct the Bodily Robotic — Now, you’ll be able to construct your bodily robotic arm. By this stage, you recognize you might have a working design (because of the simulation), working actuators, and a working robotic program. This considerably reduces the probabilities of sudden errors cropping up.
- Debug and Refine the Code — Even with the very best examined simulation, you’ll in all probability have to debug the robotic design while you transfer your program to the bodily robotic. Make iterative modifications to each your bodily design and robotic code.
- Program and Repeat Till Blissful — The method of constructing a robotic arm is barely over when you find yourself blissful that it meets your necessities. When your easy program works properly on the bodily robotic, attempt programming a extra complicated utility.
Closing Tip: Check, Check, and Check Once more
Constructing a robotic arm is a good undertaking, no matter your causes for doing it. Whether or not you’re simply constructing a easy robotic arm for enjoyable or you might be constructing a prototype in your robotics startup, the method is comparable.
rule to comply with is “Check, Check, and Check Once more”.
With RoboDK’s highly effective robotic simulator, you’ll be able to check out completely different design modifications shortly and simply, getting your robotic up and dealing as effectively as potential.
Which step do you discover probably the most troublesome? Be part of the dialogue on LinkedIn, Twitter, Fb, Instagram, or in the RoboDK Discussion board.. Additionally, try our intensive video assortment and subscribe to the RoboDK YouTube Channel